We are all being confronted with a pandemic that is compelling us to make significant changes in how we go about our day, both on and off the job. With the current travel restrictions and the need for social distancing, we are challenged to adjust our behaviors while still being prepared to perform our rescue duties if called upon.
Maintaining rescue skills proficiency was already challenging enough before Coronavirus, and it may be even more challenging now. Although most training has been postponed at the Roco Training Center, it is still vitally important to keep your skills sharp. Confined spaces are still dangerous, and rescues will still happen. As always, it’s important to be ready.
We would like to offer some tips to help you maintain both your individual and team proficiency. These tips are not intended to provide the same level of proficiency that attending a formal refresher class would, but we feel they will go a long way in helping you keep your skills at an acceptable, if not a highly polished level.
Our Roco training department has put together a list of skills to concentrate on while doing your own in-house independent training. We based these on the skills
that have demonstrated the highest degree of erosion or loss of proficiency over time, and also the skills that are
most likely to be called upon for your rescue duties.
First on the list are knots. We should all be able to tie the knots we will need for any given rescue system, but let’s take it a step further and strive to become knot craftsmen. So break out your rope and webbing shorts, and go through your knots. The beauty of this practice is you can certainly maintain social distancing as you practice either alone or in small groups.
Let’s go beyond the basics of dress, load and safety, and start to tie knots that make the system more efficient and safer. For anchor knots like the figure 8 on-a-bight, start gauging how much rope you need to tie the knot with the resulting closed loop being more compact. My gauge is to end up with a loop that I can easily clip three carabiners into, but not much bigger than that. Those big loops end up being a hindrance when we are trying to clear a litter out of a vertical portal, or getting a rescue package up and over a parapet or guardrail. By keeping those finished closed loops nice and compact, you economize and maintain that headroom.
Work any twists or crossed material out of the knot before loading. This isn’t just a question of appearance, but in many cases helps maintain the strength of the rope or webbing as you tie the knot. The biggest advantage of reducing or eliminating twists or crossed material is that it is much easier to untie the knot and is certainly easier to recognize the knot as being correct during final safety checks.
Practice tying knots around anchors coming from different angles and positions relative to the anchor. It is easy to tie a clove hitch around a horizontal pipe. Now start practicing tying it around a vertical anchor. Or better yet, while you are standing on the opposite side of the anchor from where the standing section of rope is coming from. It is the same knot, only now you are seeing it from a different orientation.
So, challenge yourself to become a knot craftsperson. Tie knots in the dark or blindfolded, behind your back, with winter gloves on, or any other way that is more challenging than in an air-conditioned well-lit room.
To identify the skills that you should be practicing beyond basic knots, refer to your rescue preplans and list the skills required for your most likely rescues, as well as your worst case scenarios. Don’t worry about building scenarios yet, instead divide the individual and team skills into discernable categories using the equipment that you have in your rescue cache. During your rescue plan reviews, make sure to keep an eye out for any plans that need to be updated.
The most common skills used, and the ones that seem to have a high degree of perishability, are:
- anchor and system rigging
- patient packaging
- mechanical advantages, and
- converting mechanical advantages to lowers (or vice versa)
Practice Tips (heading to test H2 tag)
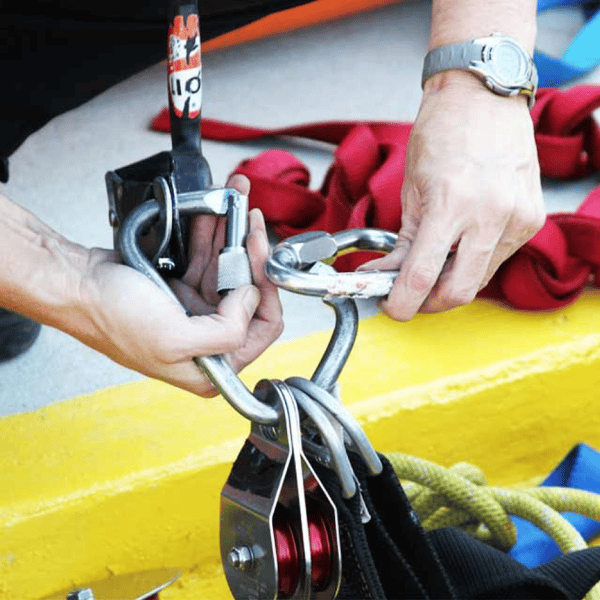
ANCHOR AND SYSTEM RIGGING
Anchor rigging is half science and half art. Of course, we need to identify the anchors that we can use as either single point or multi-point anchors. Single point anchors are generally easier, but even they can be done with an eye for efficiency vs. just slapping a sling around it and calling it good. Can we extend that single point anchor to be in a better position to see the load or to be able to communicate more efficiently? Should we extend the anchor out from the wall a bit to allow room to operate a friction control device, versus being jammed against the wall and having to be a contortionist to operate the device?
For multi-point anchors, can we consistently end up with a two-point bridle that approximately shares the load equally between legs? Are we maintaining safe angles and not approaching that 120 degree critical angle? Are we hogging the anchors and leaving the safety line system with few or no options for their anchor?
CONVERTING MAs TO LOWERS
If we anticipate converting a lowering system to a haul system or vice versa, can we make the conversion efficiently? This is where the use of modern friction control devices makes our job so much easier and safer. If you are using a device like the Petzl I’D or Maestro, or the CMC MPD, or any device that can be used for friction control and as a change of direction and progress capture in a haul system, it is good to practice the conversion back and forth from haul to lower and lower to haul, even with a load suspended.
MECHANICAL ADVANTAGES
Practice building vertical simple MAs, horizontal Z-rigs, and also compound MAs. Make sure there is always a progress capture or ratchet built into the system. On the final checks, the system must be the proper ratio, including a final change of direction if called for, have a functioning ratchet, and all carabiners must be locked. If you want a little tip that works no matter what you are doing, it is this credo:
"Slow is smooth, and smooth is fast."
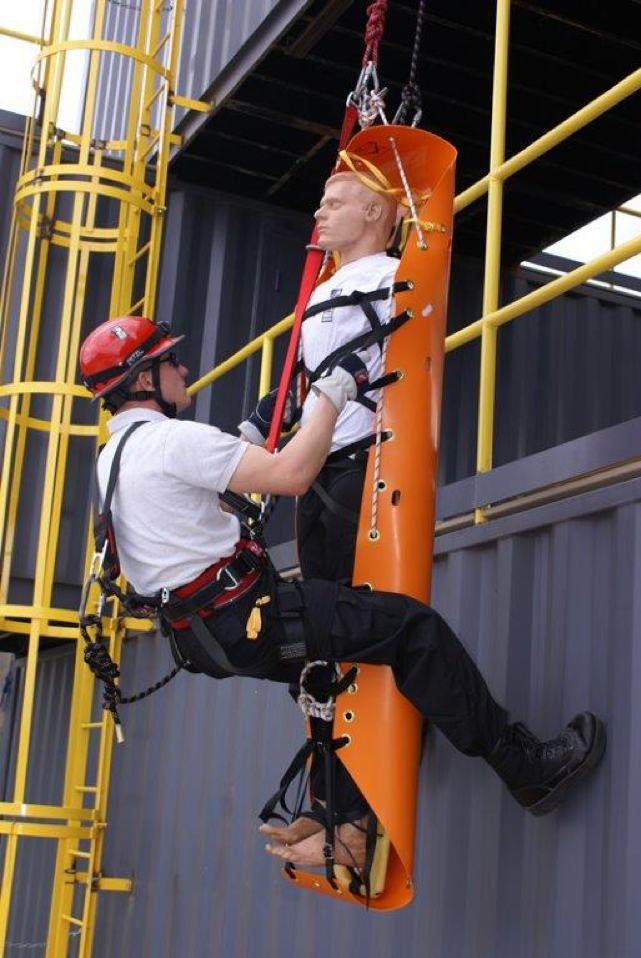
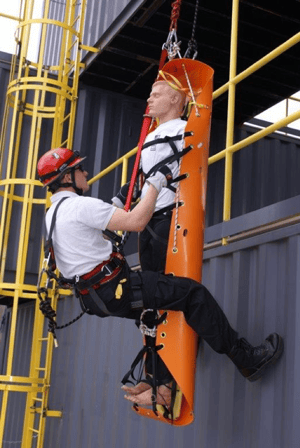
PATIENT PACKAGING
If you have a rescue manikin in your facility, now is a great time to practice social distancing by practicing patient packaging. No matter which type of litter you are using, there is a lot of value in practicing with that litter to correctly secure the patient in the litter and then to create a safe and efficient bridle to attach the rescue system. Practice this for both rigid and flexible litters and for horizontal and vertical orientations.
For all the skills we have already listed, you can perform the practice solo and then step back to let one of your teammates do a quality and safety check on your work.
Finally, we all like to have some fun when we practice, so why not inject a bit of competition into the scene? We love to have races to see who can build mechanical advantages fastest, but the most important thing is not the time. When scoring your contest, focus on the accuracy and safety of the finished product. You can set up multiple lanes separated by the social distancing guidelines and have one team member be the timer and score keeper.
Conclusion (to test H4 tag)
So remember that team performance is dependent on individual skills coming together to build and operate the right system for the situation at hand. Now is a great time to focus on individual skills so when this pandemic is finally past us, we can rock it as a rescue team.


